


Analytics module
The Analytics module responds to events generated by the Formitable booking widget. Connecting the module to Facebook or Google provides better insight into how the widget is used by your website visitors.
Introduction
The Analytics module is an add-on that you can load when embedding the Formitable Widget. This module responds to the events generated by the widget on your website. For example: page views, Facebook pixel events and Google eCommerce events are automatically tracked in the accounts that are already installed on your website.
If this module is not sufficient for your needs, our widget events give you complete freedom to do your own implementation. At the end of this document you will find some examples on how to do this.
Installation
When you generate the embed script for your website on the Widget API page, the Analytics module is turned on by default. You can recognize this by the following piece of code in the callback of the Formitable SDK script: FT.load('Analytics'); By removing or adding this code you can switch the module off or on.
Extra settings
When loading the module you can specify the following additional settings (see example at the bottom of this section)
sendPageViews: boolean
The module tracks page views based on actions of your guests in the widget. For
example /ft/widget/success for a successful reservation. With this setting you can turn
this
on or off. By default this setting is on.
disableFacebookTracking: boolean
Disable the default built-in Facebook Pixel tracking in the Analytics Module. By default this setting is off.
disableGoogleTracking: boolean
Disable the default built-in Google Analytics tracking in the Analytics Module. By default this setting is off.
conversion: object
By default, the price paid in the widget for the product is used as conversion
value.
A reservation without payment is therefore set at conversion value 0. You can override
these
values per product by adding a "conversion" object to the settings object. For each
product
(id: string) you can set the conversion value (value: decimal). The object with ID "1"
is
used for reservations without a ticket.
- <script>
- (function(d, s, id, h) {
- var ftjs = d.getElementsByTagName(s)[0];
- if (d.getElementById(id)) return;
- var js = d.createElement(s);
- js.id = id;
- js.src = "https://cdn.formitable.com/sdk/v1/ft.sdk.min.js";
- h && (js.onload = h);
- ftjs.parentNode.insertBefore(js, ftjs);
- }(document, 'script', 'formitable-sdk', function() {
- FT.load('Analytics', {
- 'sendPageViews': false,
- 'disableFacebookTracking': false,
- 'disableGoogleTracking': false,
- 'conversion': {
- '1': {
- value: 60
- },
- '23a89154': {
- value: 11.25
- },
- '499bde6b': {
- value: 112.50
- }
- }
- });
- }));
- </script>
Facebook Pixel
If a Facebook pixel is installed on your website, events are automatically tracked. You can find an overview of these activities in your Facebook Business Manager. You can also test the operation of your Pixel here by going to Event testing and making a reservation.
The following events will be tracked:
ContentView
When opening the ticket view in the widget
| Params: | content_type, content_ids, content_name |
AddToCart
When navigating to checkout with a ticket selected
| Params: | id, name, price, quantity, category |
InitiateCheckout
Always called when navigating to checkout
| Params: | - |
Purchase
When a reservation or order is successfully finished
| Params: | contents, content_type, value, currency |
Google Analytics
Since July 1st, 2023, GA4 is the only supported way of implementing Google Analytics on your website. Therefore we have updated this manual with instructions on how to read data from the Formitable Widget in your GA4 account. There's no need for extra configuration on your website to get Formitable data in your GA4 account, but there are some ways to tweak the data you'll receive by changing the conversion object as explained here.
More info on how to implement Google Analytics on your website can be found here.
Tracked events
Open widget (open)
When opening the widget (eg. clicking on book a table)
Close widget (close)
When closing the widget
Product view (view_item)
When opening the ticket view in the widget
Add to cart (add_to_cart)
When navigating to checkout with a ticket selected
Checkout (begin_checkout)
When navigating to checkout
Purchase (purchase)
When a reservation or order is successfully finished.
The events above are automatically tracked for your property. We will add the product name, value and quantity if possible.
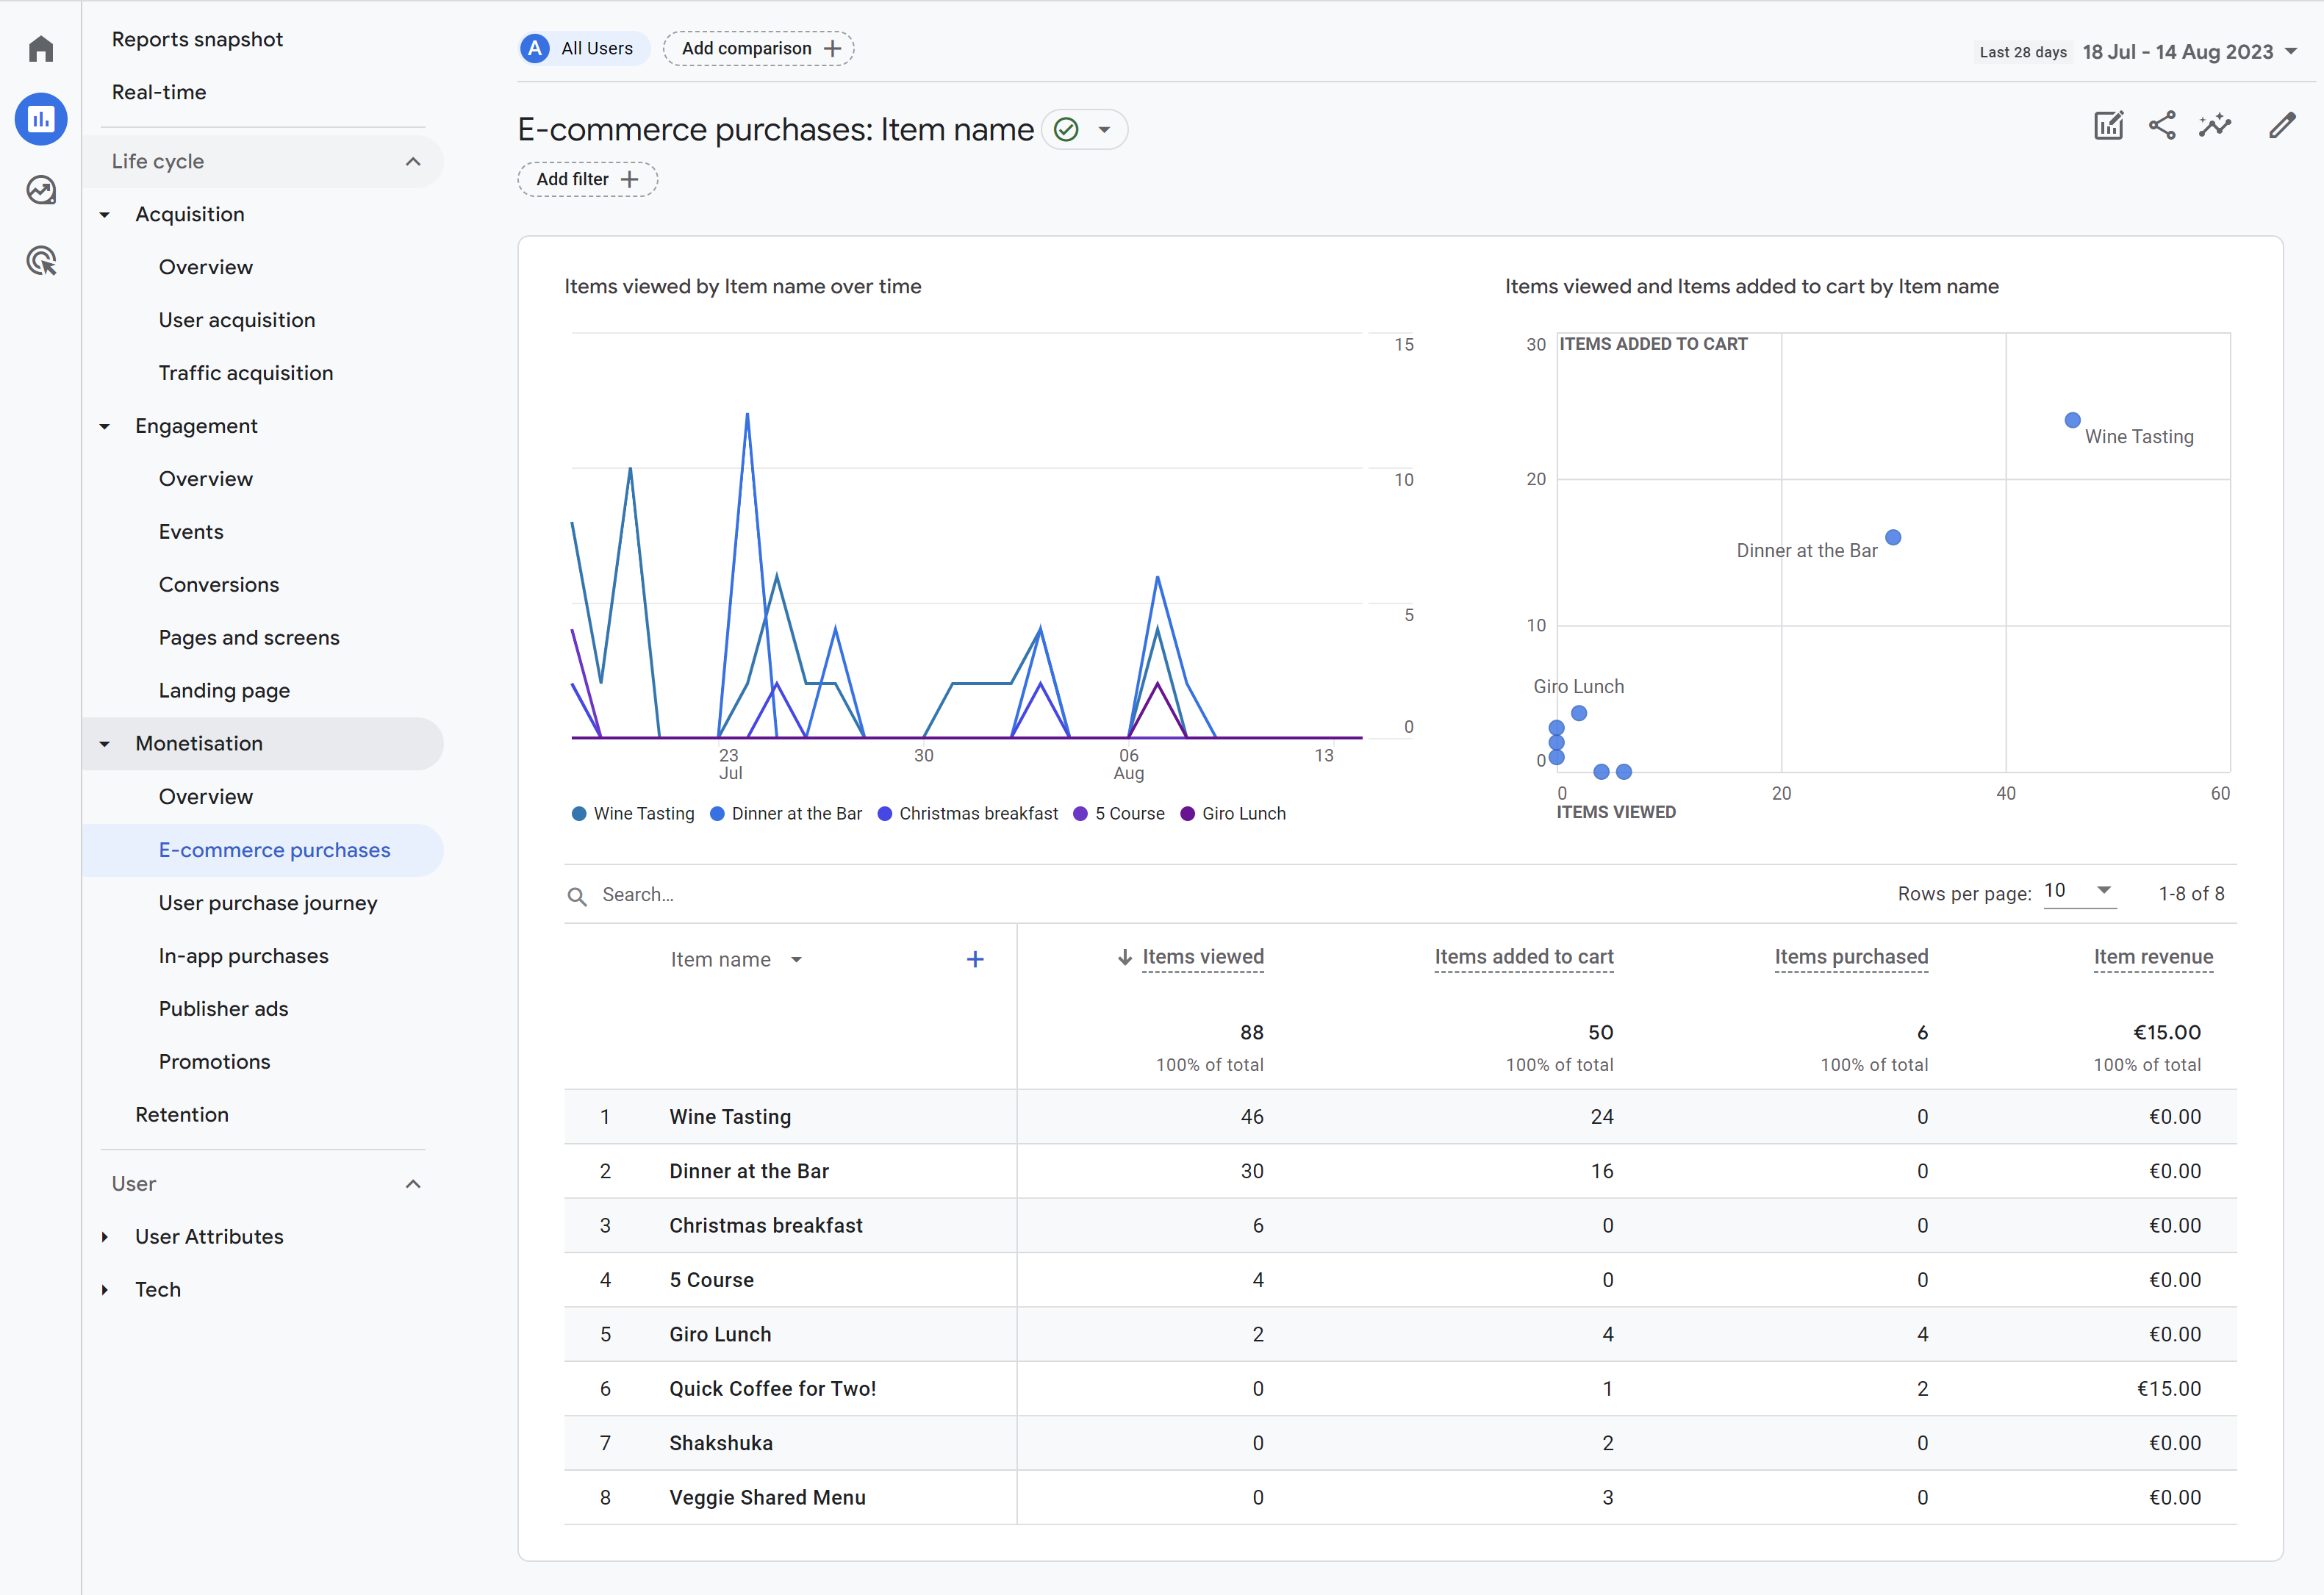
You can find the data in Reports > Engagement > Events but for more detailed e-commerce data we recommend you to visit
the Monetisation section. Here you will find detailed analysis on what products have been viewed, added to the cart or purchased.
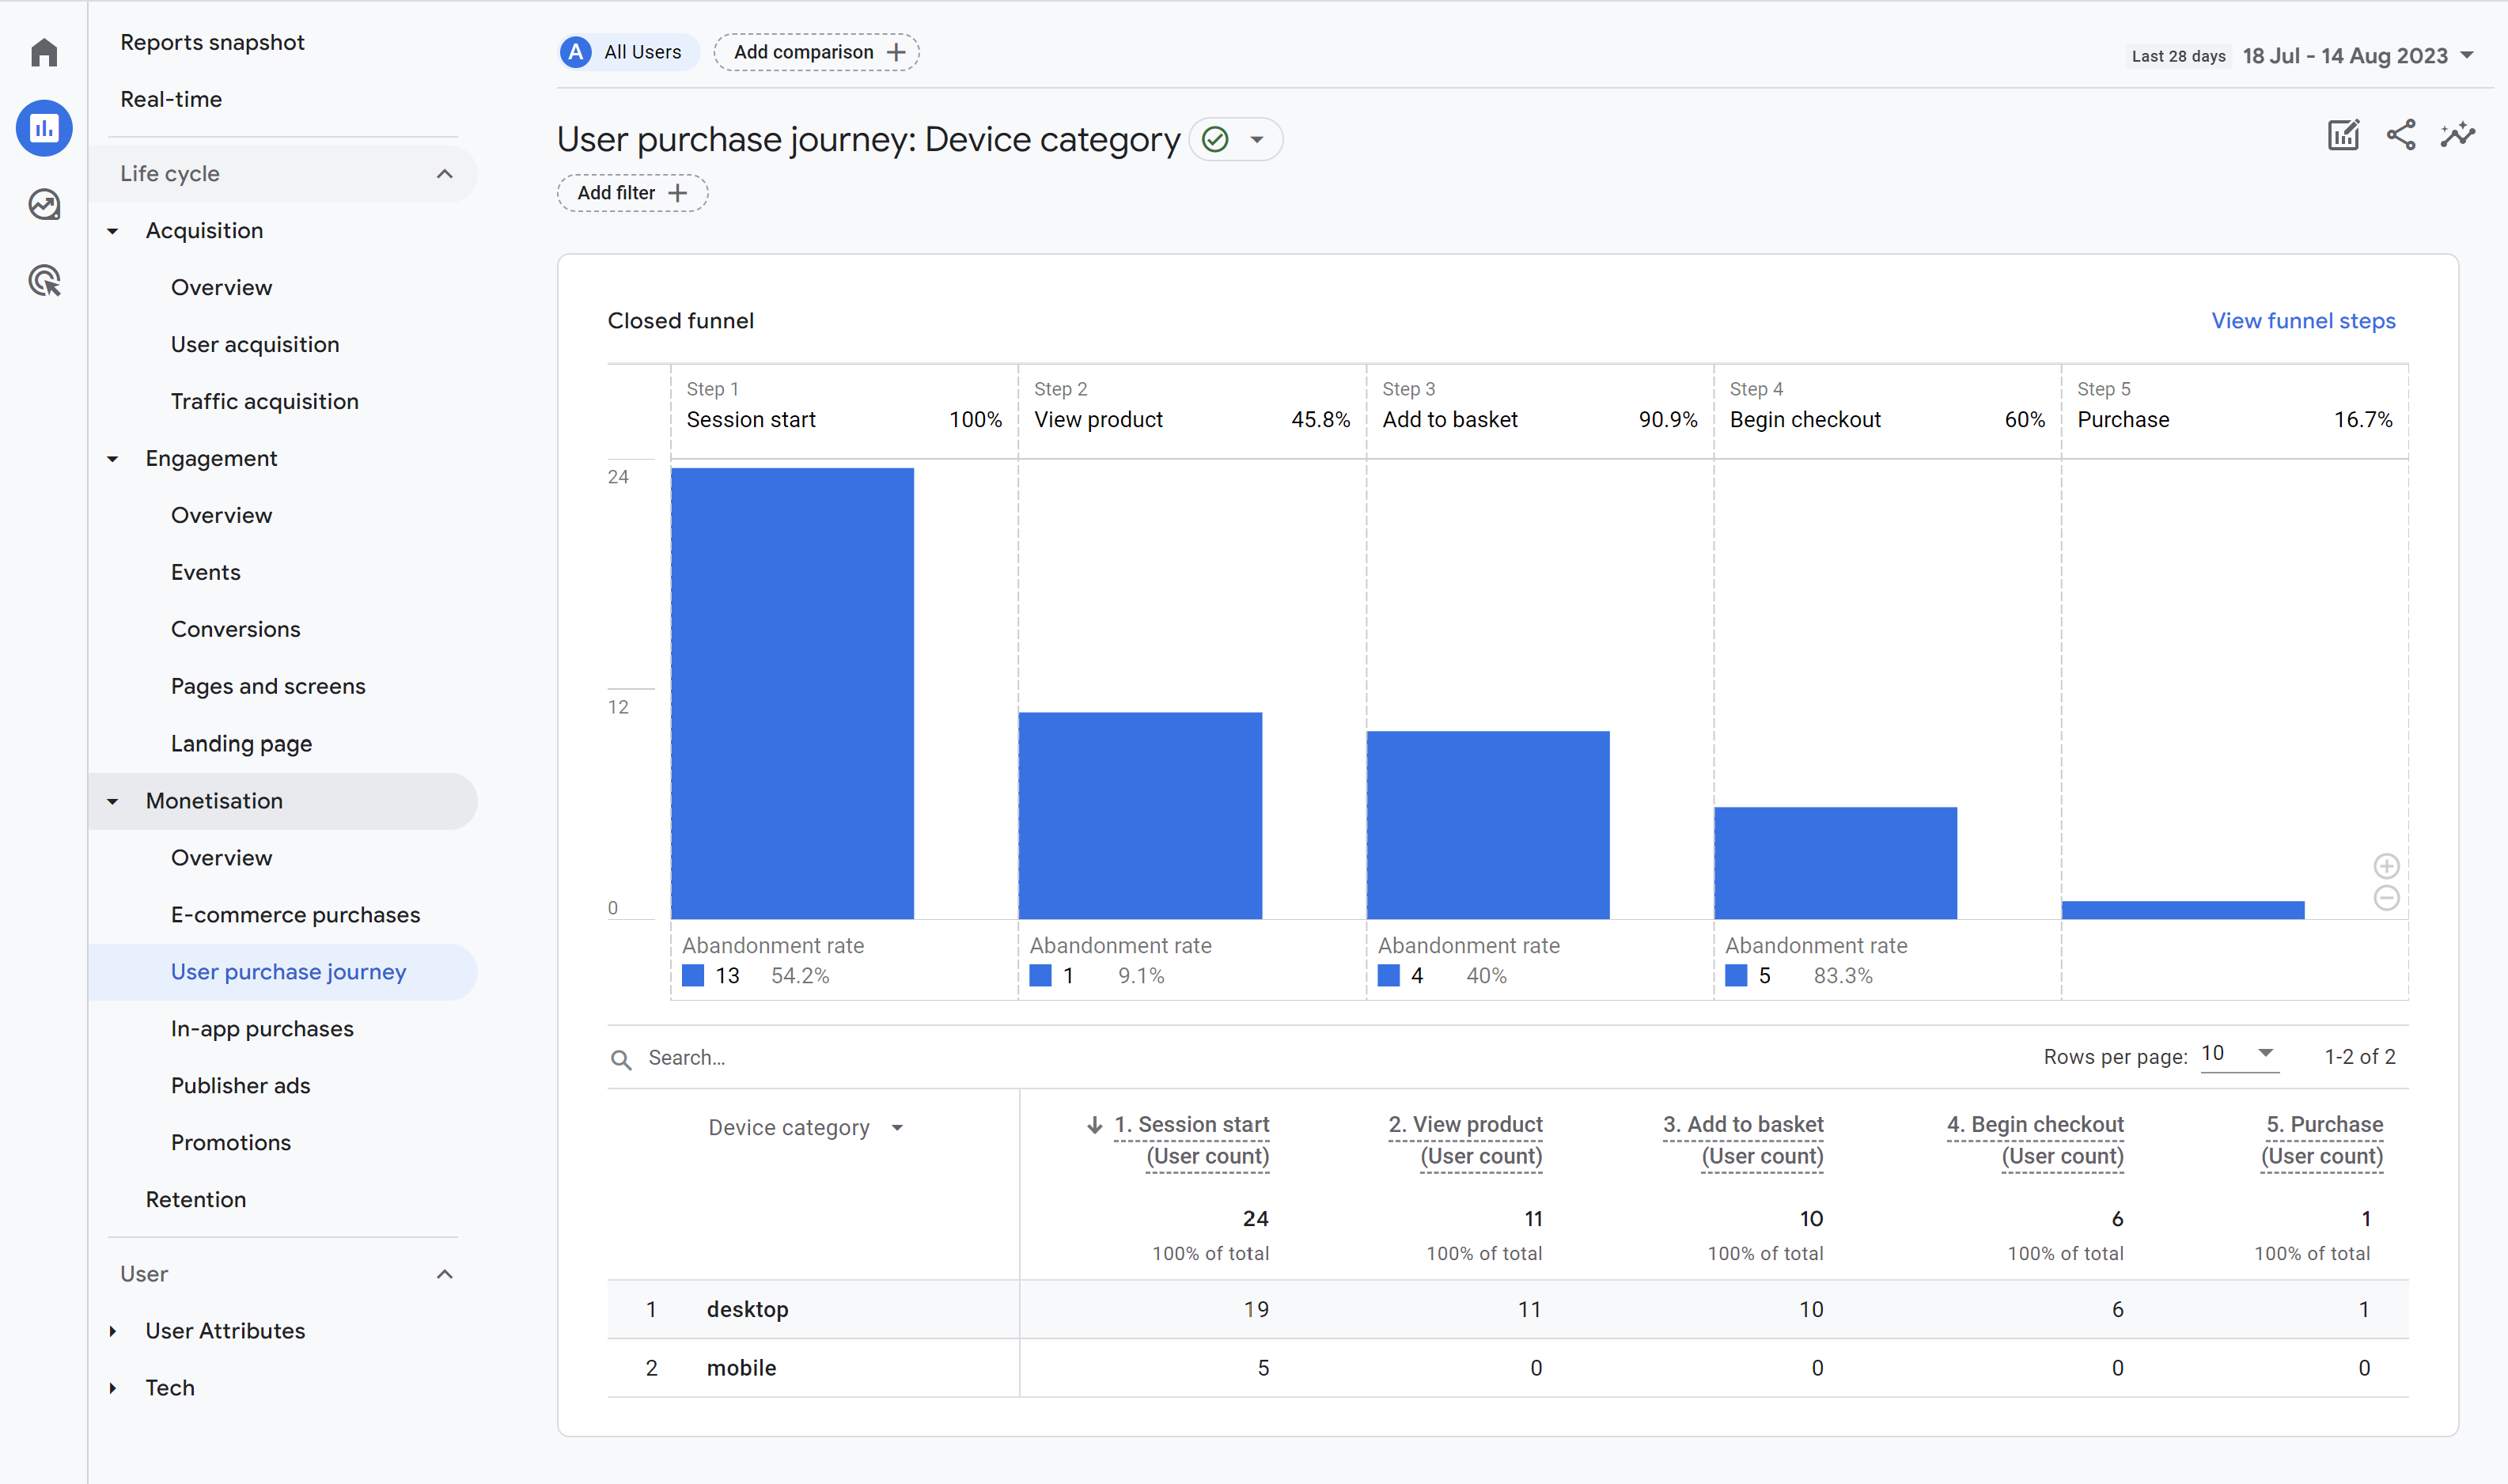
Furthermore you will find data on User Purchase Journeys and other in-depth analysis of the products in your widget.
E-commerce purchases
 User purchase journey
If you still need a "thank you" page to measure conversions please read on below on how to implement a redirect after a succesful conversion. In most cases this is not necessary anymore as GA4 automatically marks the Purchase event as a conversion. More info here.
Custom Event Examples
Because the Formitable widget is fully integrated into your website, the options are unlimited. Events on your website are fired for all actions visitors do in the widget. This allows you to easily track data, but also redirect users to a thank you page, for example. For a complete overview of what is possible you can study the Widget API documentation .
Redirect to Thank you-page
If you want to send your visitors to a thank you page after they complete a reservation, you can use
the ft-widget-ordered event.
- <script>
- window.addEventListener('ft-widget-ordered', function(e) {
- FT.widgets.get().close(); // close the widget
- window.location.href = '/en/thankyou/'; // redirect to thank you page
- });
- </script>
Show a popup when selecting a specific ticket
You can show your website visitors a popup if they select a specific ticket.
- <script>
- window.addEventListener('ft-widget-navigated', function(event) {
- if(event.detail.page == 'checkout') {
- // at this time there’s always 1 product selected
- var ticket = event.detail.products[0];
- if(ticket && ticket.uid == 'a1b2c3d4') {
- confirm('Please note that our boat leaves at 7PM exactly. We cannot refund your ticket when you show up late.');
- }
- }
- });
- </script>
Measure conversion in Google Ads
In this example we combine registering a conversion in Google Ads with redirecting to a thank you
page.
- <script>
- window.addEventListener('ft-widget-ordered', function(e) {
- FT.widgets.get().close();
- gtag('event', 'conversion', {
- 'send_to': 'AW-123456789/AbC-D_efG-h12_34-567',
- 'value': event.detail.order.totalAmount,
- 'currency': 'EUR',
- 'event_callback': function() {
- window.location.href = '/en/thankyou/';
- }
- });
- });
- </script>